Projection Apparatus
Historical document, translated for reference. It reflects medical knowledge of the 1920s–30s and is not medical advice.
Summary
This article from the 1928–1936 Soviet medical encyclopedia describes the principles and types of projection apparatus used for scientific and educational demonstrations. It covers shadow projection, diascopic projection, and microprojection, detailing the necessary light sources, condensers, and optical arrangements for various applications.
Encyclopedia article (1928–1936)
PROJECTION APPARATUS, devices with the help of which an image is obtained on a screen. The simplest method of projecting any objects onto a screen is shadow projection. The screen is illuminated by a beam of diverging rays from a powerful light source. Objects are placed in the path of the light rays, from which shadows are cast onto the screen. The light source should be as point-like as possible (e.g., a voltaic arc) to avoid the phenomenon of penumbra. In shadow projection, one should under no circumstances use any optical glass. Shadow projection is especially often used during demonstrations of various experiments in large auditoriums. Fig. 1 gives an example of a demonstration in shadow projection of a gas siphon. (On the right is a bomb with CO2, with a reduction valve and a rubber tube for filling the upper beaker.)
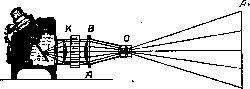
Fig. 1. and a rubber tube for filling the upper beaker.) For obtaining a shadow projection, one can use an ordinary projection apparatus with a voltaic arc, having removed the objective and condenser. Even more convenient for shadow projection is the "Lilliput" lamp (with a voltaic arc). For ordinary projections in transmitted light rays (diascopic projection), projection lanterns are used. Between the light source and the projected object in such a lantern (Fig. 2) is placed a biconvex
lens.
Figure 2. Diagram of a projection lantern: AB - object; L1B1 - image on the screen; K - condenser; O - objective. (The text continues: or better, two plano-convex lenses, turned with their convexities toward each other), a so-called condenser, the purpose of which is to collect the diverging rays of the light source and thereby more strongly illuminate the object (AB), which is placed between the focal and double focal distance of the objective (O). On the screen, a real, enlarged image (A1B1) of the object is obtained. The focal distance necessary for clear projection is set with the help of a rack-and-pinion mechanism, which sets the objective mount in motion, as well as by adjusting the light. To obtain a correct image of a slide on the screen, it should be placed in the projection apparatus inverted 1) "upside down" and 2) with the front side toward the screen. When projecting experiments, it is, of course, highly undesirable to obtain inverted images on the screen, for example, so that water pours from bottom to top. Therefore, it is necessary to invert the path of the rays before the screen. This is achieved by passing them through a reversing prism (see the diagram in Fig. 3), placed after the objective in the narrowest part of the beam of rays.

In diascopic projection lanterns, a voltaic arc usually serves as the light source; in cheaper ones, a powerful electric lamp is often used instead. A disadvantage of lanterns with lamps turns out to be the uneven illumination of the projected object. Acetylene lamps are also used. In pre-revolutionary years, alcohol-incandescent lamps were widely used. In the absence of these light sources (in rural conditions), one can also use a kerosene lamp with a flat wick. The skill of handling the light source is extremely important, as it is usually precisely the malfunctions with the light source that cause many troubles during an illustration. In a projection apparatus, the voltaic arc is equipped with either an automatic or a manual regulator. Manual adjustment is preferable, allowing one to more accurately set and subsequently maintain the position of the voltaic arc, which turns out to be absolutely necessary when projecting a whole series of experiments. In a projection apparatus for projecting slides, an arc with automatic regulation is more convenient. When using an arc powered by direct current, one should use a manual regulator in which the positive carbon is located horizontally, and the negative one is either vertical or somewhat inclined. With such an arrangement of the carbons, the obscuring of the arc crater, which is its brightest part, by the negative carbon in the horizontal direction is avoided, which is very essential for a projection apparatus. To protect the condenser from the impact of carbon fragments from the voltaic arc, it is recommended to place an ordinary window pane between the condenser and the voltaic arc. In order to avoid the heating of projected objects in a projection apparatus with a voltaic arc, the light rays are forced to pass first through a plane-parallel bath with water, placed either between the condenser lenses or directly behind it. The bath should be filled with distilled water, as tap water contains air, which is released in the form of bubbles that settle on the walls of the bath and reduce the brightness of the illumination. In a slide projection apparatus, the objective is attached directly to the lantern; in a projection apparatus for demonstrating various experiments, the objective is separated from the lantern body and mounted on a separate stand.
For projecting slides, an ordinary photographic camera can be used as a projection apparatus. The back wall of the camera is removed, and a slide is placed in a special frame in place of the cassette. To illuminate the slide, an illuminating lantern is attached to the camera, in which a powerful electric bulb is placed at the focus of a concave mirror (spherical or, better, parabolic). The objective of the camera serves as the objective. A similar setup is also used for enlarging photographs. In the latter case, a negative is placed in a frame in place of the cassette, and photographic paper is mounted in place of the screen. Very many experiments can be performed only in horizontal vessels. To project them onto a vertical screen, a very simple device is used—a horizontal projector (Fig. 4). Light rays from an ordinary projection lantern after the condenser fall onto a flat mirror (Z1), set at an angle of 45°, and illuminate the horizontal object AB. Further, the rays enter the objective (O), which can move in a vertical direction, then fall again onto a second flat mirror (Z2), also set at an angle of 45°, and, having reflected from it, fall onto the screen, where the image (A1B1) is obtained. Usually, in horizontal projectors, the mirrors (Z1 and Z2), the objective, and the stage with a glass bottom for the object AB are mounted together on one stand. Often, instead of mirror Z2, a prism with total internal reflection is used. For projecting opaque objects—drawings, pictures, photographs—reflective projection apparatuses are used—episcopes. In them, light rays, reflecting from a mirror, fall onto the projected object, reflect from it, and further their path is the same as from the stage of a horizontal projector. Most episcopes are adapted for slide projection as well, and then they are called epidiascopes (Fig. 5). The best epidiascopes are manufactured by Zeiss in Germany
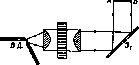
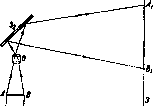

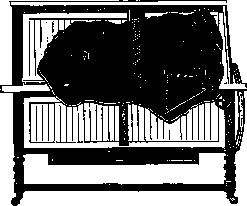
Figure 5. Epidiascope with the path of the rays shown.
and Reichert in Austria. For demonstrations in medicine, physiology, physics, mineralogy, and chemistry, it is very essential to have the possibility of using microprojection. For this purpose, projection microscopes have been designed. A flat mirror is attached to the eyepiece of the microscope at an angle of 45°, and with its help, the image is cast onto a screen, selecting the appropriate focusing. As a light source, special illuminators mounted near the lower collecting mirror of the microscope are used; one can also use the light of an ordinary projection lantern (in a converging beam of rays), but in this case, it is absolutely required to weaken the thermal effect of the rays by passing them first through a thick layer of water (through 2-3 water baths) (see Microscope, Fig. 56). For projection onto a vertical screen, any microscope can be adapted by placing a prism with total internal reflection (or a flat mirror at an angle of 45°) above the eyepiece. A projection microscope with a mirror can also be very simply adapted for projection onto a horizontal plane, which is very useful for work related to sketching specimens.
a. Iris. Projection apparatus are one of the most common means of applying the visual method (see), making any visual aid, even of small size, accessible to a large audience. The projection lantern was invented in the late 16th, early 17th century. First described by Kircher ("Ars magna lucis et umbrae", 1671). The importance of the projection lantern, which was widely used in the early 20th century, is now declining in connection with the development of cinematography, which due to its dynamism has exceptional advantages over static projection, making it possible to show much more clearly various physiological or pathological processes (e.g., blood circulation, movement, digestion), as well as production processes from the point of view of labor hygiene, first aid training (bandaging), etc. Lantern slides ("hazy pictures") are glass plates measuring 87a X81/* cm (abroad the size 10x87g cm is accepted), on which some image, drawing is applied. Usually lantern slides are made in the same way as photographs, by placing a positive plate instead of photographic paper on the negative and passing light rays through it. For durability, the lantern slide is covered with a simple cover glass and edged with black paper around the edges. The black lantern slides obtained in this way can be painted with aniline transparent paints; since small drawings are usually painted by hand, this doubles (and sometimes more) the cost of the lantern slides. Along with the most common production of lantern slides photographically, they can also be made by drawing ordinary glass with ink (black or colored), in this way cartoons, slogans on glass can be made. To make such homemade lantern slides, cut glass is coated with a composition of gelatin, and on such glass, which has a slightly rough surface, a drawing is easily applied. Lantern slides are inserted into the lantern with the help of a special wooden frame, usually designed for 2-3 lantern slides, with a movable socket that allows the lecturer to change lantern slides without interruption. The lantern slide is inserted into the frame upside down, with the top part down, because reverse projection is obtained. For safe transportation of lantern slides, special boxes with sockets are made. However, a set of 50 glass plates weighs quite a lot and is bulky. Therefore, in recent years, the production of lantern slides on film has become widespread, where on a small reel, convenient for carrying in a pocket, 30-40 lantern slides can be placed. A significant saving is obtained in price, since a black lantern slide costs 40-50 kopecks, while a reel with 40 lantern slides on film costs only 80 kopecks, i.e. 20-25 times cheaper. Unfortunately, these film lantern slides cannot be projected on an ordinary lantern and require either changing the lens or a special apparatus, which is now produced under the name "filmoscope". Lantern slides can be used for the so-called "light newspaper", where a certain topic is presented on lantern slides in sufficient sequence with connecting texts, special cartoons, etc. Screen for receiving the enlarged image. Any smooth white surface (plastered whitewashed wall, sheet of paper) can be used as a screen, but in such cases, of course, it is difficult to obtain a completely clear image. Usually the screen is made of canvas, and movable screens are fixed on poles. The standard size of the screen is 2x2 m, 2.5X2.5 m. a. Edelstein.
Related articles
Mentioned in
Cite this page
“Projection Apparatus.” Soviet Medical Encyclopedia. English translation of Bolshaya Meditsinskaya Entsiklopediya, 1st ed. (Moscow, 1928–1936), ed. N. A. Semashko. https://sovietmedicalencyclopedia.com/article/projection-apparatus/